
Ophyd#
Ophyd is the hardware abstraction layer developed by NSLS-II and used by BEC to communicate with the hardware.
It is a Python library that provides a uniform interface to different hardware components.
Ophyd is used to control the hardware and to read out (meta)data of devices.
It is also used to create a virtual representation of the hardware in the form of devices and signals.
Hardware can be tested without spinning up BEC, simply by importing the Ophyd library.
Ophyd devices#
Representative objects for different type of devices are created dynamically on the device server.
For the most simple case, a certain set of core methods and properties need to be implemented.
Based on the type of device, BEC expects ophyd devices to provide certain functionality.
Signal and Device are the most simple type of devices that are used within BEC.
A signal has no sub-components, while a devices may contain sub-devices as well as sub-signals.
Nevertheless, the interface provided by Ophyd allows both to share a similar interface.
Overall, BEC differentiates between device, signal, positioner and flyer.
A diagram with the hierarchy of inheritance is shown below.
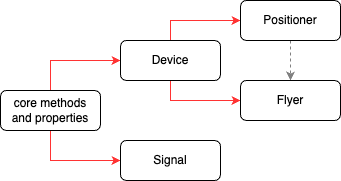
Inheritance scheme for devices and signals in BEC.#
We note that this hierarchy is inspired by different base class from Ophyd:
Device, Signal, PositionerBase and FlyerInterface, while also enhancing certain aspects of these classes for ease of use.
Core functionality#
The following section lists core properties and methods.
We note that by inheriting from Ophyd Device, Signal or a children class like PvPositioner for EPICs devices, all methods and properties below will already be implemented.
name -> str
Property with name of the device; it will also be used for naming convention of signals from a device.kind -> int or ophyd.Kind
Property for the kind (ophyd.Kind) of the device or signal.parent -> object
Property that points to the parent device.root -> object
Property that points to the root device.hints -> dict
Property that returns a dictionary with hints for callback operations on the device. The return dictionary lists all signals of typekind.hintedwith the structure{'fields' : ['signal_name', ...]}.connected -> bool
Property to check if a device or signal is connected (settable)._destroyed -> bool
Instance attribute that indicates whether a device has been destroyed, should be False by default. The destroy method should set this to True.destroy() -> None
Method to destroy the device. A destroyed device can not be reconnected, in addition, the instance attribute_destroyedmust be set toTrue.read() -> dict
Read method of the device which returns a nested dictionary with all signals of typekind.normalandkind.hinted. Example:{'signal_name': {'value': ..., "timestamp": ...}, ...}read_configuration() -> dict
Read configuration method of the device which returns a nested dictionary with all signals of typekind.config. Example:{'signal_name': {'value': ..., "timestamp": ...}, ...}describe() -> dict
Describe method of the device which returns a dictionary with signal descriptions ofkind.normalandkind.hinted. The dictionary is composed of entries for each signal with additional information about source, dtype and shape of the signal’s return value. Example:{'signal_name': {'source': ..., "dtype": ..., "shape" : ...}, ...}describe_configuration() -> dict
Similar like describe, but returns a dictionary with information about signals of typekind.config. The same pattern as for describe applies.trigger() -> ophyd.DeviceStatus
Trigger the device and return an ophyd.DeviceStatus object, which is used to track the status of the trigger call. The status should resolve once the device has been triggered successfully, which means the.set_finished()method has been called on the status object.
Signal#
Signals are among the simplest objects that can be loaded by BEC. For instance, we can utilize the readback value of an EPICS PV to create a basic signal. Alternatively, we may generate a custom signal from a temperature controller to track during the measurement process.
Implementing a signal involves extending the core functionality with a few additional methods. It’s important to note that by inheriting from ophyd.signal, these methods are already provided. However, their functionality needs to be ensured at the device level, particularly for devices with custom integration, and potentially override methods from ophyd.signal.
limits -> tuple[float, float]
Property that represents the limits of the signal and returns a tuple with high, low limits. We note, high_limit == low_limit is equivalent to no limits.high_limit -> float
High limit property for the signal.low_limit -> float
Low limit property for the signal.write_access -> bool
Property which defines whether the signal can be written to.check_value(value : float) -> None
Method that checks whether a value is within the given limits of the device. Returns None, but should raiseLimitErrorif the value is not within limits.put(value : any, force : bool=False, timeout : float=None) -> None
Calls of put should be non-blocking, and if not force, it should check the request value usingcheck_valuemethod (i.e. for position values). A timeout can be specified for the put call.set(value : any, force : bool=False, timeout : float=None) -> ophyd.Status
Set method of signal. This typically callsputin a thread and returns anophyd.statusobject that will resolve once the call return successfully. It can be made a blocking call by running.wait()on the status object.
Device#
Devices provide additional methods that become relevant for the scan interface within BEC.
Scans usually follow a pattern of bootstrapping devices using stage and unstage for the cleanup procedure.
The relevant methods are implemented through the interface provided here, i.e. again in analogy to the interface implemented for ophyd.device.
_staged -> ophyd.Staged
Instance attribute that indicates whether a device has been staged, and should return anophyd.Stagedstate, i.e. Staged.yes, Staged.no or Staged.partially.stage -> list[object]
The stage method prepares the device for an upcoming acquisition. The method is idempotent, meaning it should raise if called twice without anunstagecalled in between. If possible, we suggest the implementation of a bootstrap approach throughout this function where devices prepare themselves for an upcoming scan based on the metadata provided by the scan itself, i.e. exposure time, number of images/frames or scantype==fly/step. Stage will return a list of objects that were staged, i.e. itself ->[self]. We recommend to returnsuper().stage()from the parent class if the parent is inherited from the Ophyd repository to ensure that all stage signals are properly set.unstage -> list[object]
The unstage method should be used to cleanup the device after an acquisition. It should be possible to call unstage multiple times in a row, and it should resolve fast in case no acquisition took place. After an actual acquisition, unstage can be used to check whether the acquisition finished properly and potentially raise if not (i.e. logic to be discussed during device integration with BEC developer). Again, we recommend to returnsuper().unstage()from the parent class if inheritance from Ophyd is present.stop(success : bool) -> None
Stop method of the device. The success flag should be used to indicate whether the device has been successfully stopped. We recommend callingsuper().stop(success=success)if a class inherits from the Ophyd repository. Note, the stop call should also resolve whether a device is staged or not, i.e. call unstage of the device. Here, we see that additional instance attributes such as _stopped can be useful to handle internal logic of stage/unstage/stop.configure(d:dict) -> dict
The configure method accepts a dictionary with signal_name, value pairs to set signals on the device. In the upstream Ophyd repository, e.g. forophyd.device, the method implements a way to set signals of kind.config.summary() -> dict
The summary method provides a string representation of the device. This includes the different type of signals of the device.
Positioner#
A simple example for a positioner is the implementation of a motor. Positioners extend the functionality of the device, and mix in similar properties as seen for the signal. In addition, they need to implement a move method that executes the motion and provides feedback to BEC. Below is the functionality that is required to extend the methods of the device to comply with the interface of a positioner.
limits -> tuple[float, float]
Property that represents the limits of the signal and returns a tuple with high, low limits. We note, high_limit == low_limit is equivalent to NO limits.high_limit -> float
High limit property for the signal. Should also implement a property.setter method.low_limit -> float
Low limit property for the signal. Should also implement a property.setter method.
check_value(value : float) -> None
Method that checks whether a value is within the given limits of the device. Returns None, but should raiseLimitErrorif the value is not within limits.move(value : float) -> ophyd.DeviceStatus
Method to initiate a motion of the device. It should return a status object of type DeviceStatus that needs to resolve once the motion is finished. It should become a blocking call by calling.wait()on the status.set(value : float, timeout : float=None, move_cb : callable=None, wait : bool=False) -> ophyd.DeviceStatus
With direct inheritance fromPositionerBasefrom the upstream repository, the set method of a positioner is calling the move method. The behaviour can be overridden by children but a motion should be executed upon using set.
Flyer#
Flyers extend the existing interface for device with two more methods. During a fly scan, the scan logic implemented on the scan server is more linked to the functionality of a device, i.e. continuous line scans.
kickoff() -> ophyd.DeviceStatus
Upon calling kickoff, the flyer should start and return a status object that resolves once the flyer flies, i.e. is ready to or already acquiring data.complete() -> ophyd.DeviceStatus
The complete method of the flyer returns a status object. This status should resolve once the flyer finishes, thus, the method can be used to identify when a flyer is finished.
Ophyd device configuration#
As mentioned before, BEC creates representative devices and signals dynamically on the devices server, following the specifications given in the device configuration. As explained in the device configuration section, the device configuration can be loaded from and stored to a yaml file and contains all necessary information about the devices.
An example of an ophyd device based on EPICS is a single PV, e.g. the synchrotron’s ring current:
curr:
  readoutPriority: baseline
  description: SLS ring current
  deviceClass: EpicsSignalRO
  deviceConfig:
    auto_monitor: true
    read_pv: ARIDI-PCT:CURRENT
  deviceTags:
    - cSAXS
  onFailure: buffer
  enabled: true
  readOnly: true
  softwareTrigger: false
The following sections explain the different parts of the device configuration in more detail.
deviceClass
The device class specifies the type of the device. In the example above, the device class isEpicsSignalRO, which is a read-only signal based on EPICS. Another example isEpicsMotorfor motors based on EPICS. For a full list of available device classes, please refer to the Ophyd documentation and the Ophyd devices repository.deviceConfig
The device config contains the configuration of the device. In the example above, the device config contains the read PV (read_pv). The read PV is the PV that is read out by the device. In this case, the read PV isARIDI-PCT:CURRENT. The device config can contain any configuration parameter that is supported by the device class. The device is constructed by passing the device config to the device class. In the example above, the device is constructed by callingEpicsSignalRO(name='curr', read_pv='ARIDI-PCT:CURRENT', auto_monitor=True).readoutPriority
The readout priority specifies the priority with which the device is read out. For BEC controlled readouts, set the readout priority either toon_request,baselineormonitored. The “on_request” priority is used for devices that should not be read out during the scan, yet are configured to be read out manually. The baseline priority is used for devices that are read out at the beginning of the scan and whose value does not change during the scan. The monitored priority is used for devices that are read out during the scan and whose value may change during the scan. If the readout of the device is asynchronous to the monitored devices, set the readout priority toasync. For devices that are read out continuously, set the readout priority tocontinuous.enabled
The enabled status specifies whether the device is enabled.readOnly
The read only indicates if the device is read-only. When set to true, writing to the device is disabled. It’s optional in the device configuration and defaults to false.softwareTrigger
The software trigger determines if BEC should explicitly invoke the device’s trigger method during a scan. It’s an optional parameter in the device configuration, defaulting to falsedeviceTags
The device tags contain the tags of the device. The tags are used to group devices and to filter devices.onFailure
The on failure parameter specifies the behavior of the device in case of a failure. It can be eitherbuffer,retryorraise. If an error occurs and the on failure parameter is set tobuffer, the device readout will fall back to the last value in Redis. If the on failure parameter is set toretry, the device readout will retry to read the device and raises an error if it fails again. If the on failure parameter is set toraise, the device readout will raise an error immediately.description
The description contains the description of the device. It is used to provide additional information about the device.
Combining config files#
The device configuration can be split into multiple files. This can be useful to group devices by their functionality or to split the configuration into smaller files for better maintainability. To combine multiple device configuration files, use the !include tag in the device configuration. The paths can be either relative or absolute. Please note that the !include tag cannot be placed at the root level of the device configuration and must be within a dictionary, e.g.:
base_config:
  - !include ./path/to/base_config.yaml

endstation:
  - !include ./path/to/endstation_config.yaml

curr:
  readoutPriority: baseline
  description: SLS ring current
  deviceClass: EpicsSignalRO
  deviceConfig:
    auto_monitor: true
    read_pv: ARIDI-PCT:CURRENT
  deviceTags:
    - cSAXS
  onFailure: buffer
  enabled: true
  readOnly: true
  softwareTrigger: false
In the example above, the base_config.yaml and endstation_config.yaml files are included in the device configuration. The curr device is defined directly in the device configuration. Alternatively, the base_config.yaml and endstation_config.yaml files can bec combined into a single tag:
external_config:
  - !include ./path/to/base_config.yaml
  - !include ./path/to/endstation_config.yaml
For a single file, the !include tag can also be merged into a single line:
base_config: !include ./path/to/base_config.yaml
Validation of the device config#
To avoid errors during loading of the device config, the device config should be validated before loading it. This can be done by installing the ophyd_devices package and running the following command:
ophyd_test --config ./path/to/my/config/file.yaml
This will perform a static validation of the device config and will print any errors that are found. For checking if the devices can be created and connect successfully, an additional flag can be passed:
ophyd_test --config ./path/to/my/config/file.yaml --connect